Tuesday, May 27, 2014

New FMQ Project


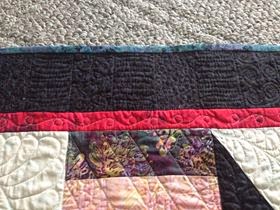
I started my newest free motion project yesterday. After looking through books and online websites, I decided to free motion scrolls in the "ribbons" and little clamshells in the white background. I got the idea from Natalia Bonner's book Beginner's Guide to Free Motion Quilting. I'm using the same variegated Superior thread I used on my last quilt. The light variegated pastels makes it easy to blend on many of the fabrics used in this quilt. As you can see in the photo, I used the 505 Spray again to keep the 3 layers together.  I really love this spray. I don't get puckers and the layers stay together very nicely. And it's fast! It takes less than an hour to get all 3 layers stuck together.


Here's a picture of what I've been doing. I'm going nice and slow and am happy with the results so far. It's easy to space out the scrolls easily since I'm using the 2 1/2 inch background squares as guides for placement.


I only get to make 4 scrolls in a row and then I have to change direction. I can't really build up too much speed but I'm going along with the ribbon design.


I think these scrolls will keep me busy for awhile. Too bad I have to work the next 3 days!! So much quilting to do!!

Wednesday, May 21, 2014

12 Blocks Done!!


 Here are the 12 blocks that I've finished for the Tone It Down Quilt Along. This started back in January so I guess I'm a little behind! I'm working on it at my own pace. I tend to work on a few projects at once so it will take a little while longer. I don't mind that it's taking awhile. I am cutting out each block's pieces individually. Each block is made up of 97 pieces. (I'm glad I didn't count them until after I'd started!)  Even the cutting takes a while! Here's one block cut out.


You can see why each block takes awhile. I usually work on two blocks at a time. I think it saves time but I have to be careful to not mix up pieces. I have mixed them up a few times. I figured it out pretty quickly so it was easy to fix.


These are the 2 newest blocks I just completed. As work intensive as these blocks are, I still love making them. They always seem to finish up very nicely. Besides, I only have 8 more blocks to go! I can't quit now.  I've already started picking out the fabrics for the next 2 blocks!

Sunday, May 18, 2014

A Finish!!


I just finished sewing down the binding on this quilt I made for my daughter's friend.  The pattern was from the Fat Quarter Shop. It used charm packs and was called Charm Pack Cherry Quilt. (Very appropriate!) I just have to slap a label on it and give it a nice washing. I'm hoping she likes it!

Here's some detail on the quilting.


I used the scroll flower quilting pattern that I learned from Amy's Free Motion Quilting Adventures. I really like the way it came out. Every once in awhile, I would have a little area too small for a flower so I added a leaf. It worked out very nicely. The scroll flower was quilted on the inner portion of the quilt. I stitched in the ditch where I sewed the border.

 
In the border, I decided to just meander. I really liked the look of the variegated thread on the pale yellow.  It seemed to create another pattern in the stippling.

This was the quilt that I used the 505 adhesive spray to hold the layers together. I loved it! The layers stayed together very nicely. I loved being able to quilt and not have to take any pins out. I plan on using it again. I had no problems whatsoever using the spray in place of pins. I think I actually quilted this quilt faster since I could build up some speed and not have to slow down to remove pins.


My son graduated yesterday. He received a Bachelor's degree in business. My daughter finished her Master's degree this past December. She didn't take part in the ceremony but both their names were in the program. I am so proud of them both! They seem to have grown up overnight! Where does the time go??

Thursday, May 15, 2014

Knitting Update


You may be wondering what the heck is in this picture! Well, it's supposed to be a shrug. It's not finished yet! (Good thing!)  I started by casting on 40 stitches. I worked a cable chart which wasn't too bad. After the chart, I had to work 160 short rows! I have knit short rows in the past, but not to this extent. I started the short rows on one side and ended up on the other. From there, I worked my way back to the beginning. That's what makes the circular look of the shrug. The center seam was sewn together and the entire piece was blocked.  My next step is to pick up stitches and work on the edging and collar.


This is the book I'm using and the cover photo is the shrug I'm working on. I'm just hoping my finished piece looks like that! I'll post a picture when I'm done. I'm currently sewing down binding on a quilt I made as a gift. My daughter's friend is graduating this weekend so I'm trying to finish the quilt up as soon as I can. I hope to get back to my shrug soon. I'm hoping I'll be wearing my shrug this summer when that air conditioning gets a bit too chilly!

Saturday, May 10, 2014

Moms and Their Memories


I joined my quilt guild, the Tewksbury Piecemakers, about 18 years ago. I hadn't done much quilting but really wanted to learn. My kids were quite young then. I think my daughter was around 6 and my son was 4 years old. It seemed such a major ordeal to just find the time to go to meetings. I tried so hard to find the time to try a block of the month or anything not too time consuming.

At the holidays, the guild gave us a pattern to make a teddy bear. The guild collected them and gave them to the fire department to hand out to kids during some sort of traumatic event. I thought I would be able to handle that. It was just a pattern someone had cut out of newspaper. I pieced the front and used a solid piece for the back. You just put the right sides together and sewed them, leaving an opening. Then it was stuffed and the opening was sewn by hand.

My kids loved the little bear I made so I decided to make them each one. I had one sewing machine at the time. (I had no idea how many I would buy in the future!) My machine had been my husband's grandmother's sewing machine. It was a Singer that sat in it's own cabinet. I took that sewing machine out and started making those teddy bears. I was sewing in the family room. The kids were watching TV but keeping a close eye on my progress! They each got their teddy bear that night. They were so easy to please back then!

This is Rebecca's teddy bear today. It's been hanging around on her bed all these years and the poor thing looks it's age!


The back is even worse!


The stuffing isn't even soft anymore! Isn't it sad looking??


Here is the new updated teddy! I took it apart and washed it. I let it dry outside in the sun. I even washed the ribbon!


Rebecca picked a nice soft flannel for the back. Teddy looks nice and new again!

I thought it was appropriate to post this for Mother's Day. Repairing that teddy bear brought back all sorts of memories of when my kids were little. The years seem to go by so fast. It made me sad a little but I'm hoping we have lots of good years coming up.

P. S.  You may be wondering whatever happened to my son's teddy. It's in a bag in the attic with all his beanie babies. That's boys for you!

Happy Mother's Day!

Tuesday, May 6, 2014

Ruler Work


Amy's Free Motion Quilting Adventures is featuring ruler work for the month of May. I haven't done too much with rulers. I find it takes lots of coordination. You have to keep the ruler in place and continue to sew at the same time. It sounds so much easier than it is! However, I have used straight rulers and found they weren't too bad. In the picture above, I marked the lines using a blue marker but used a long arm ruler as I was sewing. This seemed to work very nicely for me.


As you can see, I marked my lines and used different forms of free motion quilting in between the lines. I really like this effect. It makes a whole different pattern on top of the pattern created from the fabric which was what I was hoping. My favorite is to free motion quilt but the straight lines also add a bit of dimension.


In this last picture, I used a straight ruler to section off my black border. I had planned on free motion quilting in every other section but decided to fill in each section instead. I didn't mark this first. I measured my border and chose to make the sections 2 inches since the border was an even 68 inches. It worked out almost exactly!

That's the extent of my ruler work so far. I'm hoping Amy teaches us some easy ruler work that even I can master! I'm certainly looking forward to it!

Saturday, May 3, 2014

Halfway Done!


I have completed 10 blocks for the Tone It Down Quilt Along sponsored by American Patchwork and Quilting. Of course, I started late and my pace is a bit slow but I'm getting there! The blocks are 15.5 inches square. There will be a total of 20 blocks that will be separated with sashing and very small (2.5 inch square) 9-patch blocks. These blocks include lots of cutting and lots of sewing but I love them!


These are my latest blocks. I already have the colored fabrics picked for the next 2 blocks. I just have to start cutting that fabric. Maybe tomorrow??

Alaska Quilt Top

 I just finished sewing the last row onto my Alaska quilt top. I really love this quilt! It measures 49.5" square. The pattern is so pr...