Monday, August 31, 2015

Nickita Bag


I took a Craftsy class called Zip It Up: Easy Techniques for Zippered Bags. This class is taught by Joan Hawley of Lazy Girl Designs. She teaches 3 different zippered bags in this class. I've made 2 so far. I made and blogged about the Runaround Bag in July. This time, I made Nickita!


I machine quilted the top fabric, batting and lining fabric. I used a simple meander.


I attached one half of the zipper to the quilt sandwich. I love matching up the zipper color with the top fabric. It really adds to the total look of the bag.


After attaching the other side of the zipper, Joan teaches how to make sure that the zipper ends up in the middle of the bag. She's full of tips and ideas to get that perfect look.


The ends are sewn up and the bag is marked according to directions. We're going to make nice boxed corners.


Joan walks you through the process of getting a professional looking zippered tote!

In less than 2 hours, my tote was finished! My daughter loved this bag! Looks like I'm going to have to make another one for myself!

Friday, August 28, 2015

Ladybug Shawl


Here is Ladybug, a shawl pattern, by Jen Lucas. It's from her book, Sock-Yarn Shawls. I did use sock yarn to make this shawl!


I finished it on Tuesday. However, the stitches are all scrunched up. It looks pretty awful until it gets blocked. I'm new at blocking. I basically look at the finished dimensions. I wash the shawl and then try to stretch it out to the dimensions it's supposed to be. I usually just pin it to my formal living room carpet. I throw a towel over it so the cats don't pick out the pins. (They love doing that!)


Since the yarn is thin, it usually dries overnight. I love this shawl! I use shawls in the winter as a scarf. I love wearing them. They make great gifts too!!

Monday, August 24, 2015

FMQ Silly Flowers


 I started free motion quilting last year's  Mystery Quilt from my guild. As usual, it took me awhile to decide what pattern to use. I ended up with this design.


I sew a little stem and form a spiral. I follow it back and add petals and then I echo the petals. It's a variation of a few different motifs. I find free motion quilting looks very different between quilters. The final result is similar to someone's signature. Each quilter has their own unique spin on these motifs.


If I find a little space between the flowers, I quilt a little swirl, leaf or a very small silly flower. I just want the quilting to look even throughout the quilt.


I started in the middle of the quilt and seem to be working my way around. It's a nice change to be quilting an allover pattern after the custom quilting I just finished. Allover quilting seems so much faster!!

Wednesday, August 19, 2015

Rock Candy Table Topper


I finally finished quilting Rock Candy. I had blogged earlier about quilting the diamonds but wasn't sure about what to do with the background. I had all these ideas but I decided I would just quilt a very small stipple. I used black variegated King Tut by Superior Thread.


Here's a closeup that lets the quilting show up better.


I've already put it on my table. I love it! The colors are so vibrant. It looks great!

Sunday, August 16, 2015

Mancuso Quilt Show (Lengthy Post!)


The Lily Pond   45" X 42"
Bernardine Hine, Australia

I went to the Mancuso Quilt Show this past Friday in Manchester, NH. As usual, this show never disappoints! Monet is one of my favorite artists. I loved this quilt!  This quilt was painted as well as appliqued and free motion quilted. Beautiful!!

                                              
                                                       My Version of a Persion   62" X 72"
                                                       Christine Wickert, Penfield NY

This quilt was made entirely by hand using silk materials. Here's a closeup photo:


Unbelievable!

                                       
                                                         Hide and Seek   34" X 44"
                                                        Claire Wallace, South Africa

This quilt design was loosely based on a design found in a Dover Design book. The quilter took a class with Lisa Calle. It is long arm quilted and an original design.

Here's a closeup:


Beautiful quilting!!


                                                 Cocktails in Manhattan  61" X 46"
                                                   Jane Hopkins, United Kingdom

This quilt is based on an art deco picture. It is made of silk, cotton and hand dyed fabrics. It is embellished by hand made cords, lace and crystals. It's machine quilted.

Here's a few close ups:


Amazing!!


                                                 Lone Star Among Friends   51"X 51"
                                                         Margarita Schuh, Germany

The Lone Star is gorgeous all by itself. However, there are tiny stars and flying geese surrounding it. It makes the Lone Star that much more awesome!

Here is a closeup:


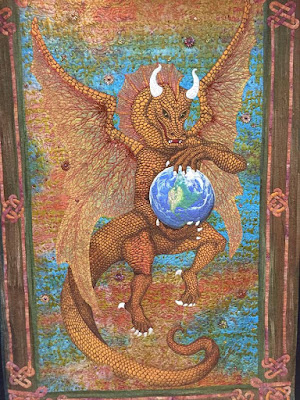
                                                   The Dragon of Greed     88" X 58"
                                                    Thom C Atkins, Santa Cruz, CA

This dragon is hand painted on silk with Prisma Color pens. Background fabric is hand dyed African batik on cotton Jacquard.

Look at this closeup!

What talent!!


                                                          Free Tibet,  46" X 78"
                                                          Meri H Vahl, Soquel, CA

This quilt was in a class of it's own! The scene depicts the Dalai Lama returning to Tibet where local people in native costumes will greet him. Black tulle overlay on a collage of Dupioni silk, silk brocades and batiks are used. Faces are drawn with Caran of d'Ache watercolor pencils and permanent markers.

Here are some wonderful closeups:


                                 Free Tibet got this ribbon! It was certainly well deserved.

Hope you enjoyed my little tour of the Mancuso Quilt Show. I love this show and look forward to it every summer. Hope you get a chance to see it too! 

Wednesday, August 12, 2015

FMQ Rock Candy


I finally decided how to quilt Rock Candy. I decided to make an FMQ loop that would fill in the diamond shape. I also outlined each diamond.


It's easy to see my FMQ on some of the darker diamonds. I'm using Aurfil 50wt thread in gray. Bottom Line, in a silver color, is being used in the bobbin.


This next picture is even closer.


I didn't have to outline each diamond. If  I didn't outline each diamond, I would have to cut thread each time I quilted inside the diamond. I could easily travel from one diamond to another using the outlined seams.

Now, I have to figure out what to do with the small border around the diamonds.

Decisions, decisions.........

Monday, August 10, 2015

A Couple of Updates


 Ladies of Downton Abbey is done! The binding has been sewn down. It still has to be washed but other than that, it's finished!! That binding went very quickly!


Here's a nice picture of the back. I love that gorgeous quilting showing through. It was certainly worth all the time and effort I put into it. (I wasn't sure while actually quilting it!)


Here's my next machine quilting project. This is Rock Candy by Jaybird Quilts. This table topper should be quilted quicker than my last project! I just have to decide how to quilt it.  It takes me forever to decide! Hoping to get it done soon.

Tuesday, August 4, 2015

Arcadia Avenue Quilt Top is Done!!


I'm so happy to report that Arcadia Avenue is now a completed quilt top! I started sewing the first row together last week. I realized it was going to be a slow process. I worked on one row at a time at a pretty slow pace.


The top and bottom of the quilt has a row made up of 60 degree triangles made of the 2 background fabrics.


I added the top black row to the first row and then added the next row of hexagons.


Taking the paper off each block was also very time consuming. I realized taking the paper off before making the row was a lot better. Each block took 30-45 minutes to remove the paper from the back. My fingers are still sore from yanking that paper off!!


I decided today was the day to finish up the whole thing! I'll be at work for a few days in a row and won't have the time to work on it. I didn't want to wait! I put the last row together and added that last black row. Done!!


The black background is made up of 2 different fabrics. This picture gives you a better idea.

This quilt finishes up at 72" by 90". I plan on giving this quilt a nice ironing. It will have to wait to be machine quilted. I need another quilt top finished for the fall. It's still a good feeling to have this one done. I'm leaving it out in my foyer for a little while. Just so I can keep looking at it!!

I Like Thursday #231

 Welcome to I Like Thursday! Please visit  LeeAnna  to link up with more fun bloggers. I've been diligently working on my son's wedd...